| Build Thread, Page :
[ 1 ] 2 3 4 5 6 7 8 9 10 11 >> (244 posts, 20 posts per page, 13 pages in total)
|
[ Next > ] |
| Creosotewind, Comment for image # 42588 | 20 Aug 20 16:41 |
| Thanks Don. |
| Don C, Comment for image # 42588 | 20 Aug 20 11:30 |
| Fun and new skills. What more can you ask for? Nice model and nice work.
|
| BriandKilby, Comment for image # 42581 | 14 Aug 20 12:06 |
| that's a good reason. |
| edtherenderman, Comment for image # 42584 | 14 Aug 20 12:04 |
| What a fun project and a great result! Thanks for sharing this! |
| Creosotewind, Comment for image # 42581 | 14 Aug 20 11:11 |
| No, but I do love to wear Hawaiian shirts. |
| Creosotewind, Image # 42588 | 14 Aug 20 11:10 |

The opposite side of the mast and spreader. It was a fun project. Lots of research beforehand, and learned some new skills. Never a bad thing. |
| Creosotewind, Image # 42587 | 14 Aug 20 11:09 |

Mast detail. You can see how the sail is tied to the mast, and the woven pattern. |
| BriandKilby, Comment for image # 42581 | 14 Aug 20 11:07 |
| my cousin lives in hawaii. do you have relations with there? |
| Creosotewind, Image # 42586 | 14 Aug 20 11:06 |

Mast attachment detail. Not sure if this is prototypical, but it follows how the rest of the boat is assembled. |
| Creosotewind, Image # 42585 | 14 Aug 20 11:05 |

I made this model for my friend who is turning his patio into a Tiki lounge. I thought is needed some more atmosphere to go with his woodworking and waterfall. |
| Creosotewind, Comment for image # 42581 | 14 Aug 20 11:03 |
| I showed this to my boss who thought it would make cool light sconces. |
| Creosotewind, Image # 42584 | 14 Aug 20 11:02 |

The completed canoe. |
| Creosotewind, Image # 42583 | 14 Aug 20 11:00 |

A small hole was drilled into the booms, and the end of a toothpick added to allow the rope an anchor to tie around. All the thread was run through a block of beeswax before use. |
| Creosotewind, Image # 42582 | 14 Aug 20 10:58 |

The outrigger added.All the wood received several layers of Minwax Polyurethane with lots of sanding in between coats. Final sanding was 600 and 1000 grit paper with a final buff coat of a paper towel, which gives the wood a nice soft sheen. Not too glossy. |
| Creosotewind, Image # 42581 | 14 Aug 20 10:54 |

After it was cut out I added looped stitching along the edges so it could get tied to the masts later. |
| Creosotewind, Image # 42580 | 14 Aug 20 10:53 |

To give it a curve (these are called "crab claw" sails) I used 3M Spray Mount to affix the paper back to back. White glue caused it to wrinkle. As it was drying I wrapped it around a paper towel roll so it would retain the curve. |
| Creosotewind, Image # 42579 | 14 Aug 20 10:50 |

The real sails were woven matts, about 16" wide. I found a matt pattern on the inter webs and scaled it to my needs. Over a printed base sheet I added each row, overlapping a bit so it suggests the seams where the matts were sewn together. |
| Creosotewind, Image # 42578 | 14 Aug 20 10:48 |

The parts ready for assembly. The bottom piece of cloth was what was provided in the kit. Not very prototypical. My new sail is the triangular piece. |
| Creosotewind, Image # 42573 | 13 Aug 20 15:58 |

In some canoes, the Wae was attached with rope. |
| Creosotewind, Image # 42572 | 13 Aug 20 15:56 |
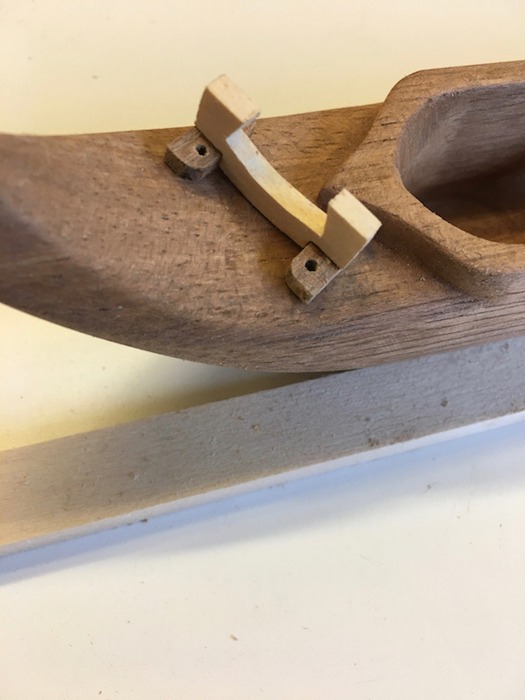
The bow is more refined. Sharp knifed are essential. Also shown is the "Wae" or spreader, that the outrigger booms are attached to. |
| Build Thread, Page :
[ 1 ] 2 3 4 5 6 7 8 9 10 11 >> (244 posts, 20 posts per page, 13 pages in total)
|
[ Next > ] |
