| Hangar |
Aircraft |
Category |
Date |
Preview |
| Skyediamonds1985 | Guillows Series 200 - SE5a | Build | 22-May-16 17:43 |  |
| Views : 567 |
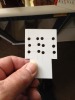
| Used X-Acto blade to cut through the covering prior to adding the decals. If you zoom up, you can also see the slots for the vertical hinges. |
| Skyediamonds1985 | Guillows Series 200 - SE5a | Build | 22-May-16 17:40 | 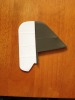 |
| Views : 480 |
| Vertical tail, The last item that needed covering. I used white Solartex for the rudder to allow for the white color portion of the red, white, and blue vertical colors. |
| Skyediamonds1985 | Guillows Series 200 - SE5a | Build | 18-May-16 23:01 | 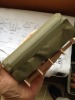 |
| Views : 610 |
| Practice concept on my dummy fuselage. I did about three of them before I worked out the final details. |
| Skyediamonds1985 | Guillows Series 200 - SE5a | Build | 17-May-16 20:27 |  |
| Views : 598 |
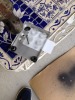
| This is the lower left wing as I was adding the thin strips of surface tapes. I decided to avoid adding the stitching to keep my sanity for the next project. I also felt I would need some practice on my "proof of concept" wing sample and making sure that the decals conform to the complex detailing of rib stitching, surface tape, and rounded leading edges of ailerons. |
| Skyediamonds1985 | Guillows Series 200 - SE5a | Build | 17-May-16 20:23 |  |
| Views : 551 |
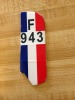
| Completed decal results. * Make sure when adding extra decal material, NOT to shorten the outside perimeter of the whole decal. Keep the outline of the decal while adding extra material from the inside of the decal. This is not going to be functioning, but it's nice to have a bit of extra detailing for those people who know what to look for. |
| Skyediamonds1985 | Guillows Series 200 - SE5a | Build | 17-May-16 20:18 | 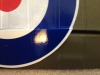 |
| Views : 566 |
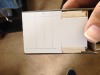
| Close up reveals the extra decal needed to wrap itself around the aileron leading edge. The amount needed is totally subjective, meaning it's up to the modeler to determine how much to allow to wrap around the top portion of the aileron, yet not too much left over to start peeking out from the underside. I'd say about 1/3 to 1/2 of the leading edge outta do it. |