| Hangar |
Aircraft |
Category |
Date |
Preview |
| LASTWOODSMAN | Aero-Werkes DPCM 104 Pfalz DIII | Parked | 17-Feb-17 20:44 | 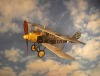 | | Views : 571 | | My buddy "Bob", who volunteers restoring our "Mosquito" bomber, at the Historic Hanger here in Windsor, just got rid of the coat hanger stand for me using Paint Shop Pro - this is the pic he fixed up in 15 minutes. |
| LASTWOODSMAN | Aero-Werkes DPCM 104 Pfalz DIII | Parked | 17-Feb-17 20:13 | 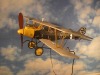 | | Views : 483 | | Pic of my 16" Pfalz D3 with an eight page composite background picture, that was then scotch taped together, on a 20" X 30" white foam display board, of a large 5,500 X 3,500 pixel file pic, of clouds and sky, converted free on the web, http://www.pdfonline.com/convert-jpg-to-pdf/ (very simple and fast), from a jpeg file to a pdf file, then opened the converted pdf file in Adobe Acrobat reader, and printed in "poster", 41 %, with 0.030" overlap of the pages - printed all eight pages - then all taped together after trimming. Two lamp lights and auto flash were used for this pic at night. Now if I could only learn Paint Shop Pro to get rid of the stand wires ... |
| LASTWOODSMAN | Dumas Kit #222, Fokker EIII | Parked | 17-Feb-17 19:46 | 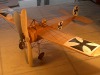 | | Views : 533 | | Last pic of what the EIII will sort of look like, after I finish the prop, stain it, clear coat it, put a hub on it, and paint up the pilot some more. |
| LASTWOODSMAN | Dumas Kit #222, Fokker EIII | Parked | 16-Feb-17 22:17 | 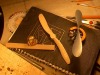 | | Views : 493 | | One coat of paint on the pilot, the old prop is now rough carved into a "Helice Eclair" prop, and the old 6" grey Peck plastic prop and nose assembly. |
| LASTWOODSMAN | Dumas Kit #222, Fokker EIII | Parked | 16-Feb-17 22:14 | 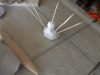 | | Views : 498 | | Backside view of pilot halves overlapping - used 5 min Epoxy for the inside, snipped off the toothpics, sanded, body filler, then sanded. |
| LASTWOODSMAN | Dumas Kit #222, Fokker EIII | Parked | 16-Feb-17 22:12 | 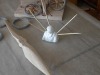 | | Views : 461 | | 1:20 scale pilot halves CA'd together with toothpics through the 1/8" overlap. Holes drilled with a #59 0.0410 bit first. |
|
| Hangar |
Aircraft |
Category |
Date |
Preview |
| LASTWOODSMAN | Dumas Kit #222, Fokker EIII | Parked | 16-Feb-17 22:08 | 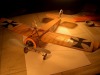 | | Views : 532 | | This 17 1/2" EIII has been without a pilot and without a carved balsa prop for 3 years. |
| LASTWOODSMAN | Dumas Kit #222, Fokker EIII | Parked | 16-Feb-17 22:06 | 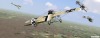 | | Views : 496 | | Dog Fight - two Fokker EIIIs pursue two DH2s. |
| LASTWOODSMAN | Dumas Kit #222, Fokker EIII | Parked | 16-Feb-17 22:04 |  | | Views : 528 | | German WW1 Fokker EIII Eindecker (One Deck or One Wing) shooting down an Allied early BE2 (Bleriot Experimental 2) |
| LASTWOODSMAN | Aero-Werkes AW 11607 - Pfalz Dr.I Triplane | Parked | 13-Feb-17 11:58 |  | | Views : 1722 | | Ian Jimmerson explains how a Radial Engine uses a Cam Ring Plate with "lobes" on it, to move the "lifter rollers" that are attached to the bottoms of the push rods, which then go up and down, to open and close the intake and exhaust valves at the tops of each cylinder (as opposed to a Car engine which uses a Camshaft with lobes) http://fireaviation.com/2016/01/23/carpenter-builds-wood-model-of-9-cylinder-radial-engine/ Part 1 - 10 min - Part 2 -9 min video |
| LASTWOODSMAN | Aero-Werkes AW 11607 - Pfalz Dr.I Triplane | Parked | 13-Feb-17 11:51 | 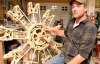 | | Views : 1751 | | HOW A RADIAL ENGINE WORKS Carpenter Ian Jimmerson has built a huge working model of a 9 cylinder Radial Engine, out of wood with clear plastic tubes on the cylinders, so you can see them go up and down, and carefully explains how all of the parts work together, and he turn the crankshaft slowly by hand so you can see everything moving. This guy should be ( maybe he already is) a teacher. Here is the video link http://fireaviation.com/2016/01/23/carpenter-builds-wood-model-of-9-cylinder-radial-engine/ Part 1 - 10 min video and Part 2 - 9 min video. Now I know how the Radial Engine works!! |
| LASTWOODSMAN | Scratch Built Curtiss Pusher | Parked | 10-Feb-17 20:39 | 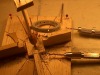 | | Views : 1342 | | The wheel rim is ready for the spokes and the hub ... first a little "Dremelling" sanding to round out the edges. |
|
